Building a Data Pipeline: Cloudflare Worker to OneDrive for Real-Time Data fetching NSE data
Learn how to build a robust data pipeline using a Cloudflare Worker to fetch NSE data, store it in OneDrive, and make it accessible for any application. This tutorial covers setup, code examples, and best practices.
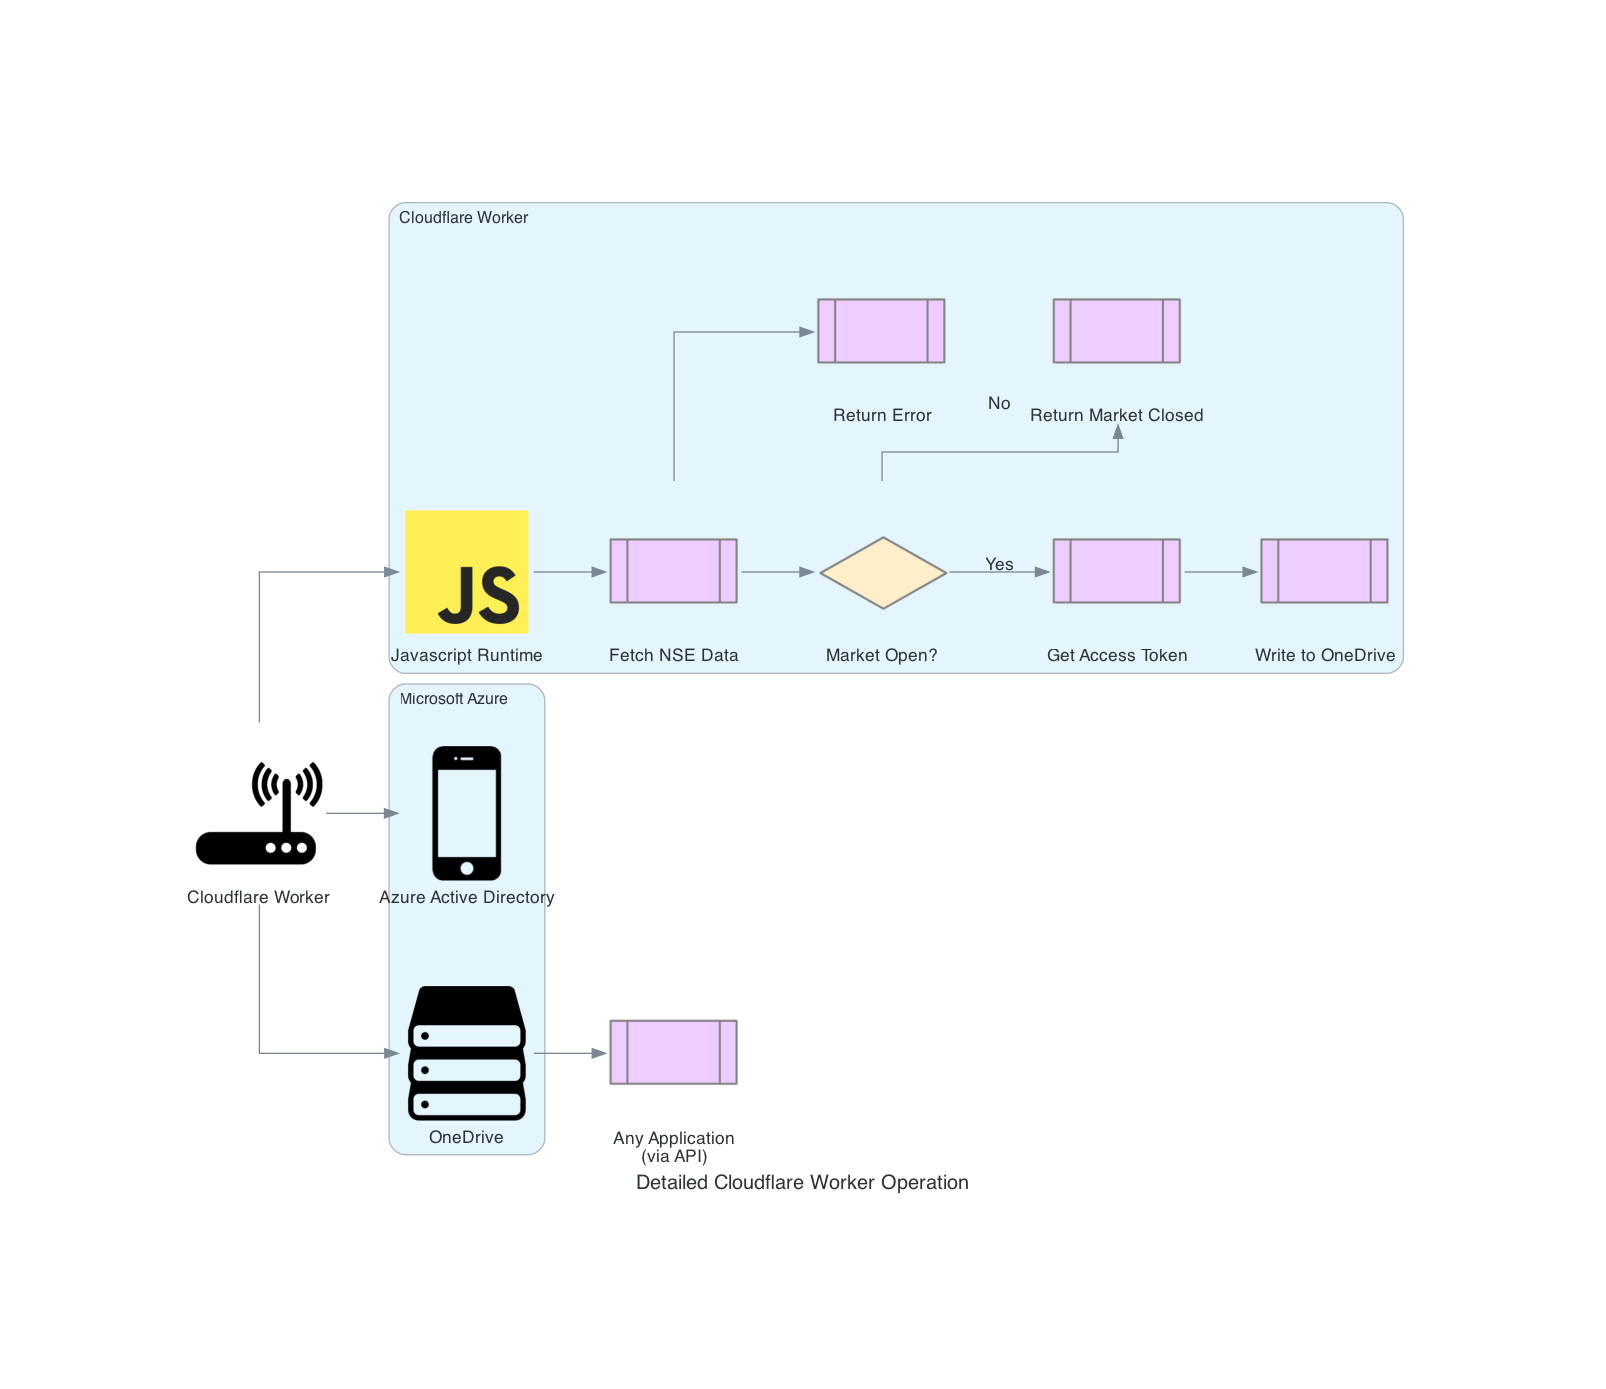
Tutorial: Fetching and Storing Data with Cloudflare Worker & OneDrive
Goal: To set up a system where:
- A Cloudflare Worker fetches data (e.g., NSE option chain data).
- The worker stores the data as JSON files in a OneDrive folder.
- A cron job via
cron-job.orgtriggers the Cloudflare Worker at regular intervals.
Prerequisites:
- A Cloudflare account with a domain.
- A Microsoft account with OneDrive.
- Basic knowledge of Cloudflare Workers, JavaScript, and APIs.
- An account with
cron-job.org.
Step 1: Cloudflare Worker Setup
This step remains mostly the same as in the previous tutorial, but I’ll include it here for completeness:
- Create a Worker:
- Go to your Cloudflare dashboard, select “Workers & Pages”.
- Click “Create a Worker”. Name it (e.g.,
nse-data-worker).
Paste Code: Copy the following Cloudflare Worker code into the editor.
1
2
3
4
5
6
7
8
9
10
11
12
13
14
15
16
17
18
19
20
21
22
23
24
25
26
27
28
29
30
31
32
33
34
35
36
37
38
39
40
41
42
43
44
45
46
47
48
49
50
51
52
53
54
55
56
57
58
59
60
61
62
63
64
65
66
67
68
69
70
71
72
73
74
75
76
77
78
79
80
81
82
83
84
85
86
87
88
89
90
91
92
93
94
95
96
97
98
99
100
101
102
103
104
105
106
107
108
109
110
111
112
113
114
115
116
117
118
119
120
121
122
123
124
125
126
127
128
129
130
131
132
133
134
135
136
137
138
139
140
141
142
143
144
145
146
addEventListener("fetch", (event) => {
  event.respondWith(handleRequest(event.request));
});

async function fetchNSEData() {
  const url =
    "https://www.nseindia.com/api/option-chain-indices?symbol=NIFTY";
  const headers = {
    Host: "www.nseindia.com",
    "User-Agent":
      "Mozilla/5.0 (X11; Ubuntu; Linux x86_64; rv:108.0) Gecko/20100101 Firefox/108.0",
    Accept:
      "text/html,application/xhtml+xml,application/xml;q=0.9,image/avif,image/webp,*/*;q=0.8",
    "Accept-Language": "en-US,en;q=0.5",
    "Accept-Encoding": "utf8",
  };

  // Fetch data
  const response = await fetch(url, { headers });
  // console.log(response)
  if (!response.ok) {
    throw new Error(
      `Failed to fetch data from NSE: ${response.status} ${response.statusText}`
    );
  }

  return response.text();
}

async function handleRequest(request) {
  try {
    // Check if market is open
    // GMT
    const istDateTime = new Date();

    // Convert GMT to IST
    const currentDateTime = new Date(
      istDateTime.toLocaleString("en-US", { timeZone: "Asia/Kolkata" })
    );

    // Display the IST time
    console.log(currentDateTime);

    if (
      currentDateTime.getHours() >= 9 &&
      currentDateTime.getHours() < 16 &&
      currentDateTime.getDay() >= 1 &&
      currentDateTime.getDay() <= 5
    ) {
      // Get a new access token
      const accessToken = await getAccessToken();

      const rawData = await fetchNSEData();
      const jsonData = JSON.parse(rawData);
      // console.log(jsonData)
      // Add timestamp to the data
      jsonData.currentDateTime = currentDateTime.toISOString();

      // Convert JSON data to string
      const jsonString = JSON.stringify(jsonData, null, 2);

      // Write the data to OneDrive
      await writeToOneDrive(jsonString, currentDateTime, accessToken);

      // Respond with only the status code
      return new Response(null, {
        status: 200,
        statusText: "OK",
        headers: { "Content-Type": "application/json" },
      });
    } else {
      return new Response("Market is closed now!");
    }
  } catch (error) {
    return new Response(null, {
      status: 500,
      statusText: "Internal Server Error",
    });
  }
}

async function getAccessToken() {
  // Replace these with your actual credentials
  const TENANT_ID = "";
  const CLIENT_ID = "";
  const CLIENT_SECRET = "";

  // Define the token endpoint
  const tokenEndpoint =
    "https://login.microsoftonline.com/" + TENANT_ID + "/oauth2/v2.0/token";

  // Construct the request payload
  const formData = new FormData();
  formData.append("grant_type", "client_credentials");
  formData.append("client_id", CLIENT_ID);
  formData.append("client_secret", CLIENT_SECRET);
  formData.append("scope", "https://graph.microsoft.com/.default");

  // Make a request to the token endpoint
  const tokenResponse = await fetch(tokenEndpoint, {
    method: "POST",
    body: formData,
  });

  // Parse the token response
  const tokenData = await tokenResponse.json();

  // Extract the access token
  return tokenData.access_token;
}

async function writeToOneDrive(data, dateTime, accessToken) {
  // Format the date as 'YYYY-MM-DD'
  const folderDate = dateTime.toISOString().split("T")[0];

  // Set the headers, including the access token and content type
  const headers = {
    Authorization: "Bearer " + accessToken,
    "Content-Type": "application/json",
  };

  // Construct the OneDrive file path within the folder
  const fileApiEndpoint = `https://graph.microsoft.com/v1.0/drive/root:/nse_data/${folderDate}/${formatFileName(
    dateTime
  )}:/content`;

  // Send the PUT request to upload the file
  const fileResponse = await fetch(fileApiEndpoint, {
    method: "PUT",
    headers,
    body: data,
  });

  if (!fileResponse.ok) {
    throw new Error(
      `Failed to write data to OneDrive: ${fileResponse.status} ${fileResponse.statusText}`
    );
  }
}

function formatFileName(dateTime) {
  // Format the date as 'YYYY-MM-DD HH-mm-ss'
  return (
    dateTime.toISOString().replace(/[T:]/g, "_").split(".")[0] + ".json"
  );
}
- Configure Credentials:
- Fill in placeholders for
TENANT_ID,CLIENT_ID, andCLIENT_SECRETin thegetAccessTokenfunction. You need to register an app in the Azure Portal to obtain these credentials. - Make sure not to commit these credentials to any public repository. Secure these values in Cloudflare secret values instead if your worker has to be public
- Fill in placeholders for
- Triggers: Add an HTTP route trigger (e.g.,
yourdomain.com/update-nse-data). - Save and Deploy: Save and deploy the worker.
- Test: Access the worker URL once to ensure it works and creates the correct folder structure on OneDrive.
Step 2: OneDrive Setup
This remains the same as in previous tutorials.
- Create a Folder:
- Create a root folder in OneDrive (e.g.,
nse_data).
- Create a root folder in OneDrive (e.g.,
- App Permissions (for API access):
- In Azure Portal, go to Azure Active Directory > App Registrations > Your App.
- Add the “Files.ReadWrite.All” permission under API Permissions.
Step 3: Setting up a Cron Job with cron-job.org
- Account Creation:
- Go to
https://cron-job.org/en/and create a free account.
- Go to
- Add a New Cron Job:
- In your cron-job.org dashboard, click on “Create Cronjob”.
- Title: Give your cron job a descriptive title (e.g.,
Trigger NSE Data Worker). - URL to call: Enter the URL for your Cloudflare worker (e.g.,
https://yourdomain.com/update-nse-data). - Schedule: Configure the schedule to run your worker at the desired intervals.
- For example: “Every hour” or “every 15 minutes”. Note that there are limitations on the interval depending on the tier.
- Email: Enter your email address to receive notifications when the cron job runs successfully (or fails).
- Click “Create Cronjob”.
- Testing:
- Click the “Run now” button on your cron job to test if the Cloudflare worker is being called successfully. Check that you get a
200 OKresponse and data is stored in OneDrive as expected.
- Click the “Run now” button on your cron job to test if the Cloudflare worker is being called successfully. Check that you get a
**Step 4: Accessing the Data **
This remains the same as in the previous tutorial. You can access your data via Microsoft Graph API
- Direct API Access: Use the Microsoft Graph API and the access token obtained in Cloudflare Worker to authenticate your requests
- Using JavaScript (Example): Use the javascript function described in the previous tutorial to obtain the data from OneDrive.
Important Notes
- Security: Protect your OneDrive API credentials and tokens. Use environment variables or secure configuration management in your Cloudflare worker. Do not commit any secret values into your repository.
- Rate Limiting: Be mindful of rate limits for both the NSE API and Microsoft Graph.
- Error Handling: Include comprehensive error handling in your JavaScript and Cloudflare worker code.
- Schedule: Choose the cron job schedule to fetch and update the data that suits your requirements.
How to Use This Tutorial:
- Setup: Carefully set up your Cloudflare Worker, OneDrive folder, and cron job on
cron-job.org. - Configure: Make sure to use your correct URLs, secrets, and schedules.
- Test: Verify the entire data pipeline is working correctly, from the cron job to the Cloudflare Worker and data storage on OneDrive.
- Access: Use the JavaScript functions discussed earlier to access your data from your applications.
This updated tutorial provides a way to automate your data fetching using cron-job.org. Now, your Cloudflare worker will automatically fetch the data and store it in OneDrive without you needing to manually trigger it. Remember to adapt it based on the specific data you are fetching and your use case.