htmx: The Modern Way to Build Dynamic Websites Without Complex JavaScript
A practical guide to htmx, the library that lets you build modern, dynamic user interfaces directly in HTML, reducing your reliance on complex JavaScript frameworks.
Here’s a hands-on guide to htmx, a library that is changing how developers approach dynamic web interfaces by embracing the simplicity and power of HTML.
Introduction to htmx
What is htmx?
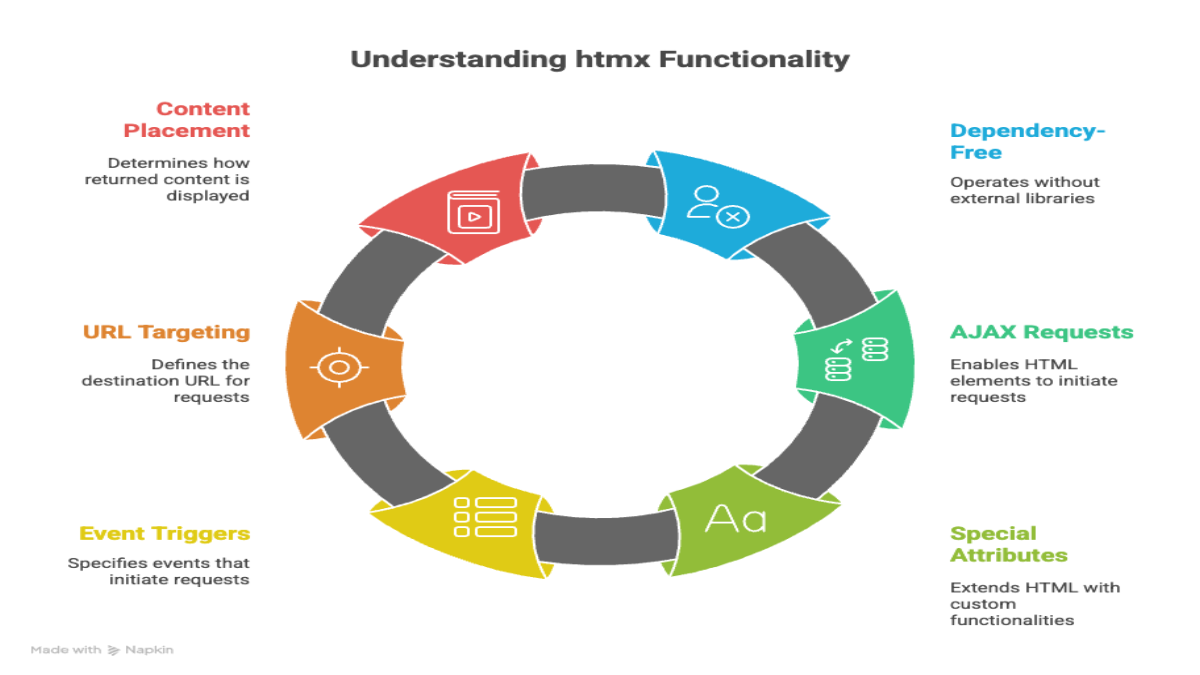
htmx is a dependency-free JavaScript library that allows you to make any HTML element issue an AJAX request. It extends HTML with a set of special attributes that tell htmx what event should trigger a request, what URL to hit, and how to place the returned content on the page.
The core idea is Hypermedia as the Engine of Application State (HATEOAS). Instead of fetching JSON from an API and rendering it with client-side JavaScript, your server sends back ready-to-render HTML fragments.
Why Choose htmx?
- Simplicity: Write dynamic interfaces using familiar HTML attributes. No complex build steps, state management, or virtual DOM.
- Reduced JavaScript: Drastically cut down on the amount of custom JavaScript you need to write.
- Backend-Friendly: It pairs perfectly with any backend language or framework (Python/Django, Ruby/Rails, PHP/Laravel, etc.) that can render HTML.
- Progressive Enhancement: Your site can work without JavaScript, and htmx enhances it with dynamic features.
- Small Footprint: The library is lightweight and has no dependencies.
Key Attributes
The magic of htmx comes from a few core HTML attributes:
hx-get,hx-post, etc.: The HTTP method to use for the AJAX request.hx-trigger: The event that triggers the request (e.g.,click,keyup,load).hx-target: A CSS selector that specifies where the response HTML should be placed.hx-swap: Controls how the response HTML is swapped into the target element (e.g.,innerHTML,outerHTML).
Setting Up htmx
Installation
The easiest way to get started is by using the CDN. Just add this script tag to the <head> of your HTML document.
1
<script src="https://unpkg.com/[email protected]" defer></script>
That’s it! htmx is now active on your page.
Creating a Simple htmx Project
Create a new directory and two files: index.html and content.html.
index.html:
1
2
3
4
5
6
7
8
9
10
11
12
13
14
15
<!DOCTYPE html>
<html lang="en">
<head>
    <meta charset="UTF-8">
    <title>htmx Demo</title>
    <script src="https://unpkg.com/[email protected]" defer></script>
</head>
<body>
    <h1>htmx "Hello World"</h1>
    <button hx-get="/content.html" hx-target="#response-div" hx-swap="innerHTML">
        Load Content
    </button>
    <div id="response-div"></div>
</body>
</html>
content.html:
1
<p><strong>Hello, htmx!</strong> This content was loaded dynamically.</p>
Running the “Hello World” App
You’ll need a simple local server to serve these files, as AJAX requests to local files (file://) are often blocked by browser security policies. You can use Python’s built-in server:
1
2
3
# In your project directory, run one of these commands:
python -m http.server 8000 # For Python 3
# python -m SimpleHTTPServer 8000 # For Python 2
Now, visit http://localhost:8000 in your browser. When you click the “Load Content” button, you’ll see the message from content.html appear in the <div> without a full page reload.
Core Concepts in Action
Let’s explore the key attributes with examples.
Triggers: hx-trigger
By default, the trigger is a click for buttons and an input or change for inputs. You can customize this.
Trigger on mouseover:
1
2
3
<div hx-get="/hover-content.html" hx-trigger="mouseover">
  Hover over me!
</div>
Trigger every 2 seconds:
1
2
3
<div hx-get="/server-time.html" hx-trigger="every 2s">
  Loading server time...
</div>
Targeting: hx-target
The hx-target attribute tells htmx where to put the HTML response.
1
2
3
4
5
6
7
<!-- The response from hx-get will replace the content of the #results div -->
<input type="search" name="q"
       hx-get="/search"
       hx-trigger="keyup changed delay:500ms"
       hx-target="#results">

<div id="results"></div>
In this example, as you type in the search box, htmx will make a request to /search and place the results inside the <div> with the ID results.
Swapping: hx-swap
The hx-swap attribute controls how the new content is inserted relative to the target element.
innerHTML(default): Puts the content inside the target element.outerHTML: Replaces the entire target element with the response.beforeend: Appends the content as the last child of the target.afterbegin: Prepends the content as the first child of the target.
Example: Infinite Scroll / Load More
1
2
3
4
5
6
7
8
9
10
11
12
<!-- index.html -->
<div id="items-list">
    <div>Item 1</div>
    <div>Item 2</div>
</div>
<button hx-get="/page2.html" hx-target="#items-list" hx-swap="beforeend">
    Load More
</button>

<!-- page2.html -->
<div>Item 3</div>
<div>Item 4</div>
When the button is clicked, the content of page2.html is appended to the #items-list div.
Working with Forms
htmx shines when handling form submissions. You can validate data and return errors without a page refresh.
1
2
3
4
5
6
7
8
<!-- HTML Form -->
<form hx-post="/register" hx-target="#form-response">
    <label>Email</label>
    <input type="email" name="email">
    <button type="submit">Register</button>
</form>

<div id="form-response"></div>
When the form is submitted, htmx sends a POST request to /register. Your backend can then process the data.
- On Success, your server could return:
1
<p class="success">Thank you for registering!</p>
- On Validation Error, your server could return:
1
<p class="error">Please enter a valid email address.</p>
In both cases, the response is placed in the #form-response div, providing instant feedback to the user.
Advanced Features (A Quick Look)
htmx offers more for complex scenarios:
- Indicators: Show a loading state while a request is in flight. Simply add a class to an element that you want to show during the request.
1
2
3
4
5
<button hx-post="/save">
  Save
  <!-- This image is shown during the request -->
  <img src="/loader.gif" class="htmx-indicator">
</button>
- CSS Transitions: Smoothly transition new content into the DOM.
- Boosting: The
hx-boost="true"attribute on a parent element (like<body>) can convert all standard links and form submissions into AJAX requests automatically. - WebSockets & SSE: htmx has extensions for real-time communication with WebSockets and Server-Sent Events.
When to Use htmx?
htmx is an excellent choice for:
- Server-Side Rendered (SSR) applications built with frameworks like Django, Rails, Laravel, or Express.
- Content-heavy sites where interactivity is needed for specific components (e.g., forms, search, live updates).
- Projects where you want to avoid a heavy, complex frontend toolchain.
- Developers who prefer to keep their logic on the backend.
It might not be the best fit for highly complex, state-intensive client-side applications like Figma or Google Docs, where a framework like React or Vue might be more appropriate.
Conclusion
htmx offers a refreshing alternative to modern JavaScript-heavy frontend development. By extending HTML’s capabilities, it allows you to build rich, dynamic user experiences with surprising simplicity and elegance. It empowers backend developers to create modern UIs without leaving the comfort of their preferred stack. Give it a try on your next project—you might be surprised how much you can accomplish with just a few HTML attributes.